
![]()
In this blog, we will discuss what is Power Apps Notify Function and it’s syntax. And how to use the Notify function to display notifications in PowerApps for success, warning, error, information, etc.
Also, we will see what are the different types of NotificationType arguments (part of the function syntax) and its uses.
What is the Notify Function in Power Apps ?
The Notify function helps to display a notification message to the end-user on the Power apps screen. The Power apps notification message will appear either until you disclose it or the timeout expires.
The default time of the notify function is 10 seconds. That means, by default, the notification message will appear until 10 seconds, after that it will dismiss automatically. Also, you can increase the notification time out in the Notify function. The Notify function always returns as true.
Power Apps Notify Function Syntax
Notify( Message [, NotificationType [ , Timeout ] ] )
Where,
- Notify : This is the function that helps to display a notification on the Power apps screen.
- Message : You must need to specify a message that will display to the user.
- NotificationType : This is the second argument of this notify function that specifies the type of message to display. The type of message in sense either it can be a success message, an informational message, a warning message, or an error message.
- Timeout : It is optional. It defines the time to wait before automatically disappear the notification message. The time is in the form of a number of milliseconds.
The different types of NotificationType in the Notify function
There are four different types of NotificationType arguments which are known as the second argument of the Notify function. Such as:
- NotificationType.Success : This notification argument specifies the message is a success notification message.
- NotificationType.Information (Default) : It is the default argument that specifies the display message is an informational notification. That means, if the user will not specify the second argument, then by default, it will take as an informational message.
- NotificationType.Warning : This notification argument specifies the display message is a warning message.
- NotificationType.Error : This notification argument specifies the display message is an error message.
Practical Examples with the different NotificationType arguments
– NotificationType.Success :
In this example, a success notification message will appear when the record will submit successfully.
In this below screenshot, there will be a Submit (check mark) button in the Powerapps form. We need to apply this below formula on the button’s OnSelect property as :

Where,
- Notify : It is a function to create the Powerapps notification
- “Event Registration Form Submitted Successfully” : It is the message that will display to the user when the record is submitted successfully.
- NotificationType.Success : It is the notification argument that will display a successful message.
- 2000 (in milliseconds) : Till 2 seconds, the success notification message will appear on the Powerapps screen.

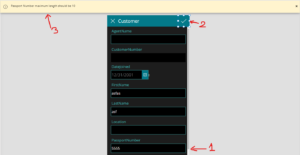
– NotificationType.Information :
In this example, an important information notification message will appear when the user doesn’t populate a field.
In this below screenshot, there will be a Submit (check mark) button in the Powerapps form. We need to apply this below formula on the button’s OnSelect property as :

Where,
- DataCardValue9.Text : It is the logical name of the field Agent Name (as you will see in the screenshot) , the condition is set on this fields value (empty or not , if empty show the notification).
- “Please fill the Agent Name field.” : It is the informational message that will appear when a user does not fill the field we want.
- NotificationType.Information : It is the notification argument that will display an informational message.
- 5000 (in milliseconds) : Till 5 seconds, the informational notification message will appear on the Powerapps screen

The picture above shows the notification because the Agent Number field is empty , if the user fills the field and then hits the check mark then the notification wont show up.
– NotificationType.Warning :
In this example, a warning notification message will appear when the user enters the Passport Number with less than 10 digits.
We need to apply this below formula on the button’s OnSelect property as :

Where,
- Len : It is the length function
- (DataCardValue14.Text)<10 : It is the Passport Number field value and it specifies it should be greater than 10 digits
- “Passport Number maximum length should be 10” : If the user will not enter the 10 digits mobile number, then this warning notification message will display on the Powerapps screen.
- NotificationType.Warning : It is the notification argument that will display a warning message.
As you can see from the screenshot the passport number is only 4 characters long so we get the notification on top.
– NotificationType.Error :
In this example, an Error notification message will appear when the user enters a Number value instead of a Text value in the Agent Name field.
Apply this below formula on the button’s OnSelect property as :

Where,
- IsNumeric : it is the numeric function , it checks if the field in the parentheses holds an numeric value.
- DataCardValue9.Text : It is the Agent Name field value
- “Please enter text only!” : It is the error message that will display when the user enters numbers in the Agent Name field.
- NotificationType.Error : It is the notification argument that will display an error message.
As you can see in the screenshot , the user has entered a number in our text field Agent Name so the user gets the error , if text is entered then the error wont show up.
As you can see from all the examples , each different notification type has it’s distinguishable color and icon. Feel free to try every example on your own and have fun with it.