
Today we will talk about the AutoNumber field in Microsoft Dynamics 365 , so you must be wondering :
1- What is a AutoNumber field ?
An auto number field is a field that you can include in an entity to generate numbered identification for each of its records. Although the software does automatically provide numbering for some ‘out of the box’ record types, such as invoices or cases, there may be many custom entities whose records you will also want to auto-number. Records for your customer accounts or sales opportunities, for example, will not be numbered automatically by the software.
With an auto number field, the number for each record will be handled entirely by the system, so there’s no need for you to identify each one as it is created. Auto number fields can save you huge amounts of time in numbering your records, and they allow for easier and faster identification of your records. Auto number fields can be set up to automatically generate numbering for a broad range of different types of entity, and there are all kinds of formatting options available for them. This means that you should be able to set up auto numbering for any kind of situation where it might be necessary.
2- Things you need to know before creating auto-number fields :
When setting up a field as an AutoNumber data type, there are a few pre-defined auto number types available to you :
- String prefixed number : This gives the auto number some text before it, eg. Account-103, ACCT-103, ACCT-104. What exactly this text is can be chosen by the user, by simply typing into the prefix box. The prefix gives an extra level of identification to the record, which could be helpful in finding the correct one at a glance.
- Date prefixed number : With this auto number type, the number will be prefixed with the date and time that a record was created, eg. 2020-09-09-103, 20-09-10-104. This provides extra information about the record’s history without having to do any further research. You can choose from a number of different date and time formats.
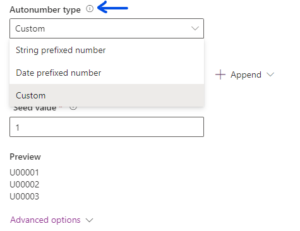
- Custom : If necessary, you can customize the formatting of the auto number field.
3- Now let’s create an auto-number field and explain every step with an easy example :
First , we need to create a simple ‘single line of text’ field , you can create the field either in the new look or the classic look of CRM but in order to make it an auto-number field you need to modify it in the new look of CRM :
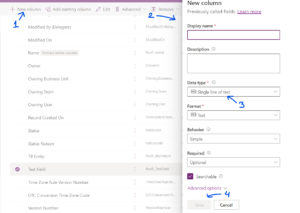
As you can see in the picture above , those are the steps to create an ‘single line of text’ field , I left them empty because I have already created the field that we will use (on the left corner of the picture its the ticked field ‘Test Field’).
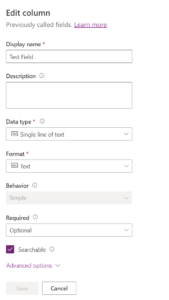
Now after creating the field , we go back to the field so we can modify it (you can only do this after creating the field not while you are creating it) :

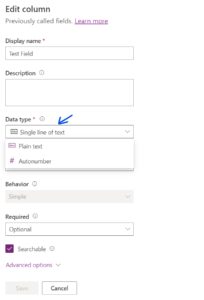
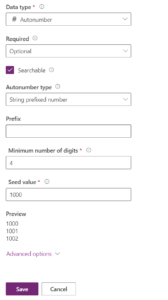
After clicking Edit a side window opens and it looks like below , in this opened window we change the data type from ‘single line of text’ to ‘Autonumber’ as shown in the second picture below and after choosing the Autonumber data type the window now changes and some other fields are added as shown in the third picture , these fields are specific to the Autonumber data type and we use them to configure it :
Let’s explain every field in the last picture above so we understand what we can do with an auto-number field :
- Required : it has a few choices if we click on it (Business recommended, Business required, Optional), this field is to setup if our field should be populated or not , we have it on ‘Optional’ which means the user doesn’t have to populate it , if we had it in one of the other choices then we would not be able to save the created record because it would throw an error that tells you that this field population is mandatory.
- Autonumber type : We explained this part and all of the options available above in section 2
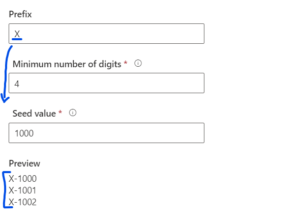
- Prefix : Just as the name it self explains this creates a prefix for the auto values of this field , I’ll show it below in a picture :
- Maximum number of digits : In this field we specify how many digits should our auto generated values will have , as you can see above we have it at 4 and in the preview the values are : 1000, 1001, 1002 etc , so it is a 4 digit number which increments by 1.
- Seed value : In this field we specify the first number from which our auto generation will start , so above we have it at 1000 and in the preview it starts counting from 1000 , so you can start from whatever value you want.
Now let’s go to the user environment and create a few records and see what happens :
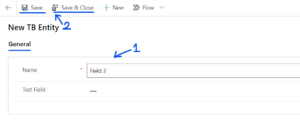
As you can see we fill the Name field (just for the example, not a necessary field or anything , just to differentiate the Test Field values), but we leave the Test Field empty , this is where the auto-number does it’s magic :

As you can see now the Test Fields are populated and the first field ‘Field 1’ has the value ‘X-1000’ in the Test Field just as we specified in the edit above , the second one has the value ‘X-1001’ and this number will keep incrementing for every new record we create.