
In todays blog we will explain how to register & debug a plug-in in Microsoft CRM. We will explain every step by using a simple example , feel free to follow each step and try it yourself.
– Registering a Plug-in
1. Firstly , we need a plugin to run so for that you can use the sample code below , which we will later debug :
using System;
using Microsoft.Xrm.Sdk;
using System.ServiceModel;

namespace Plugin_Sample
{
  public class Class1 : IPlugin
  {
    public void Execute(IServiceProvider serviceProvider)
    {
      //Extract the tracing service for use in debugging sandbox plugins
      //If you are not registering the plugins in the sandbox , then you do
      //not have to add any tracing service related code
      ITracingService tracingService = (ITracingService)serviceProvider.GetService(typeof(ITracingService));

      //Obtain the execution context from the service provider
      IPluginExecutionContext context = (IPluginExecutionContext)serviceProvider.GetService(typeof(IPluginExecutionContext));

      // Obtain the organization service reference which you will need for
      // web service calls.
      IOrganizationServiceFactory serviceFactory = (IOrganizationServiceFactory)serviceProvider.GetService(typeof(IOrganizationServiceFactory));
      IOrganizationService service = serviceFactory.CreateOrganizationService(context.UserId);

      //The InputParameters collection contains all the data passed in the message request
      if (context.InputParameters.Contains("Target") && context.InputParameters["Target"] is Entity)
      {
         // Obtain the target entity from the input parameters.
         Entity entity = (Entity)context.InputParameters["Target"];

         try
         {
            // Plug-in business logic goes here.
            string name = (string)entity["fisoft_name"];
            if (name.Contains("Hello"))
            {
              throw new InvalidPluginExecutionException("Cannot use this name!");
            }
         }
         catch (FaultException<OrganizationServiceFault> ex)
         {
            throw new InvalidPluginExecutionException("An error occurred in FollowUpPlugin.", ex);
         }

      }
    }
  }
}
2. Open the Plugin Registration Tool
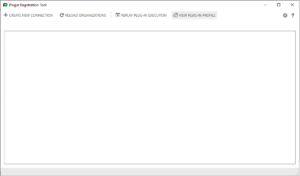
Plugin Registration Tool just like the name explains is a .exe application which makes plugin registration and debug easier , you can download the plugin registration tool from the web.
Now that we opened Plugin Registration Tool , we click on ‘CREATE NEW CONNECTION’ as you can see in the picture above , after that a new pop-up window will open and here we input our CRM credentials : email & password.
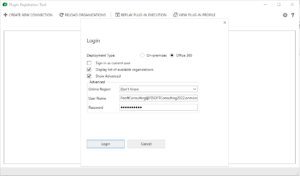
Just like above you input the credentials for your CRM and you get logged in , I suggest to check the ‘Display list of available organizations’ because inside this CRM account you might have multiple environments so with this it gives you the option to choose which environment you want to open and add a plugin.
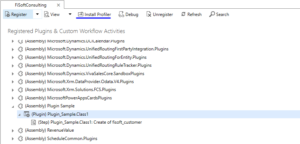
After being logged in the Plugin Registration Tool will look like this :
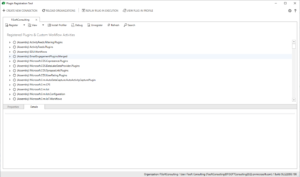
All the things you see listed above are default assemblies made by Microsoft so we don’t have to touch them. Now we add our own custom assembly but before that we first need to build the project.
3. Build the project and find the .dll file
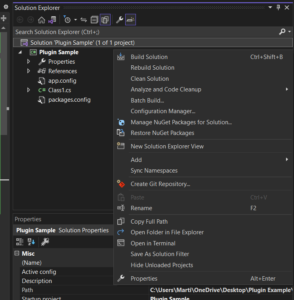
After finishing with the code and save it , you click with the right of the mouse on the ‘Solution -name-‘ and click on ‘Build Solution’ which will only show an error if something is wrong with the code and it can’t build it , this will generate the .dll file which is usually found in the folder were you saved the project, under bin/Debug/name_of_solution.dll , this is the file we need for our plugin.
4. Create a new Assembly in Plugin Registration Tool
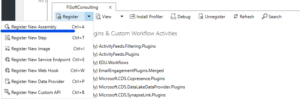
After clicking on ‘Register New Assembly’ a new pop-up window opens up like below :

You first need to load the assembly , you can do that by clicking on the ‘…’ button with the arrow pointing at it , after clicking it your local folders will open up and there you need to find the .dll file generated when you build the solution from the earlier steps. Then you can follow the other steps just like in the photo , they are self explanatory. After everything you click on ‘Register Selected Plugins’ and with this the pop-up closes and we are taken back to the previous screen.
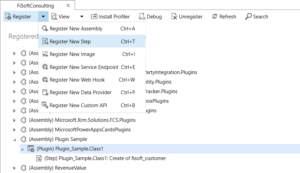
5. Add a new step to our new registered Assembly/Plugin
Adding a step means specifying when the plugin will get triggered , on what entity is expected to run , how will this plugin run etc. We’ll explain steps as we go , first creating a step looks like this.
First we need to find in the list the Assembly we just registered , for our example the ‘Plugin Sample’ is the one we registered , when opening the dropdown for the assembly we can see the plugin , now we click on the plugin and then we click on ‘Register New Step’ and with this a new pop-up window will open up where we setup the step yo our needs , in the example below I have already created the step , that’s why you can see a step under the plugin , but I will show you how it is setup.
After clicking ‘Register New Step’ the pop-up looks like this :

The picture below now shows the step we need for our example :
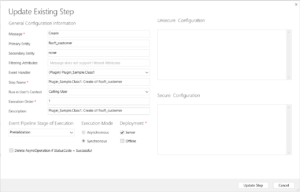
Now let’s explain all the fields we need in the pictures above :
- Message : In this field we specify the trigger for the plugin , so it could be Create/Delete/Update etc, so if we want our plugin to run/get triggered on create of a record (just like in our example) then the Message = Create, also if you start writing on the field it suggests you different type of Messages you can use.
- Primary Entity : In the code we have specified an ‘target’ entity , in the plugin we specify the primary entity which when the code is run in the system it replaces the ‘target’ entity , in our case the primary entity is ‘fisoft_customer’ which is a custom entity.
- Run in User’s Context : This field specifies which user is able to trigger the plugin , a creation of a record can be done by anyone but with this we can specify for what users do we want this code to run , in our case we leave it ‘calling user’ which means whoever creates a new record triggers it.
- Execution Order : In this field we specify the order in which the different steps inside a plugin will run , in our case we only have one step for the moment so this field doesn’t really matter but if we later add more steps then we can specify the order in which these steps will run.
- Event Pipeline Stage of Execution : Here we specify in what stage of the Event Pipeline the plugin will run , in our case we have it set to ‘PreValidation’ , which means the plugin runs before the data is send to the server , in our case we just want to check what value does a field hold and based on that we decide if we allow it or not.
- Execution Mode : In this section we specify how will our plugin run Asynchronous or Synchronous , they defer : Synchronous execution means that triggering event will wait until the plugins finishes the execution. Asynchronous plug-ins allow triggering event to finish before plugins code runs.
- All the other fields not mentioned are rarely changed so leave them just like in the picture.
With everything setup , now we click ‘Register New Step’ and we are ready to head over to CRM and try to trigger the plugin to start running and see what happens.
6. Test the Plug-in in CRM
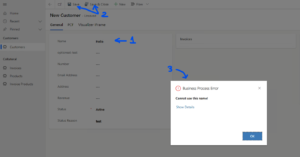
If we head over in CRM to the entity we specified in the step we created we can now test the plugin , so based on our code :

We retrieve the inputted name that the user enters and then we check if this name inputted by the user contains the word ‘Hello’ then throw an error and don’t allow it to be saved , if the user inputs a name that doesn’t contain ‘Hello’ than nothing happens , it gets saved as normally. So now we need to generate a case where the plugin throws the error and we now it’s working as shown below :
Our plugin runs correctly but let’s say we don’t really understand what’s going on in the background or we have an error or an unpredicted behavior , so let’s debug it and see how it works. 🙂
– Debugging a Plug-in
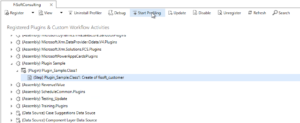
7. Install the Profiler in Plugin Registration Tool
In order to debug a plugin we need to go to the Plugin Registration Tool again and install something called ‘Profiler’ :
8. Profiling a desired step
As seen in the picture above we click on ‘Install Profiler’ and wait until it is installed, after that we choose the step we want to debug and then we click on ‘Start Profiling’
After clicking ‘Start Profiling’ a new pop-up window open up and here we specify how the error file is saved :
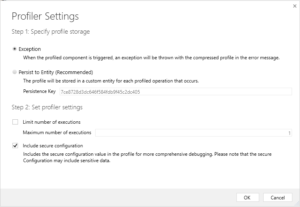
I suggest using the ‘Exception’ option in the pop-up as above , this specifies that when debugging an error text file is expected in order to debug , don’t worry the error file is automatically generated by CRM every time an error occurs , in our case since we don’t really have an error (by error I mean a real issue with the code, in itself when the condition is met we throw an error but that’s not what I meant) we will just use the case when the name is not allowed and get the error file of that.
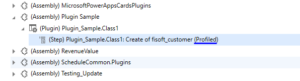
As you can see our step in the end of it reads ‘(Profiled)’ , this means we are ready to head over to CRM to generate the error/misbehavior and use it to debug :
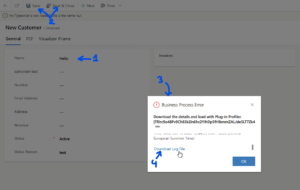
As you can see we generated the same error as in the previous test when we tested the plugin but this time we don’t get the custom error ‘Cannot use this name’ but we get the error above which indicates that the case we just generated is profiled , click on ‘Download Log File’ and you now have download the error file locally.
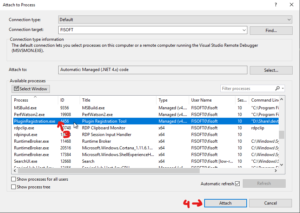
9. Attaching Process from Visual Studio
Go to Visual Studio where you have the code and first put the breakpoints in your code where you want to debug then go to Debug -> Attach Process -> Select PluginRegistration.exe -> Click ‘Attach’ , as shown below :

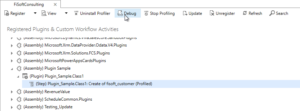
10. Debugging the plugin
After that we need to head over to the Plugin Registration Tool so we can start debugging , to do that we click on the ‘Debug’ button as show below :
After clicking on ‘Debug’ a new pop-up window will open up , in this pop-up we specify were the error file is and the local path of the assembly (the .dll file) :
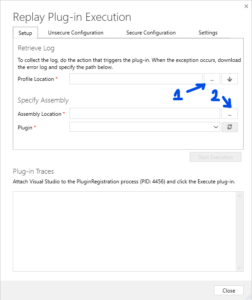
Step 1 : Find the error file we downloaded
Step 2 : Find the .dll file of the plugin
After that click on ‘Start Execution’ we are taken to the Visual Studio where the code is now in debug mode :
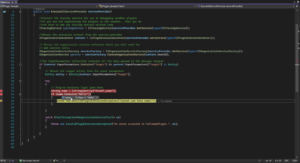
So the name variables’ value we get from CRM is ‘Hello’ , the condition is met so the error is thrown just like in the picture above.