In todays blog we will show how to download the attached file that is uploaded inside a field of type File. You might be wandering what is a field of type File , well just as the name explains a field of type File is a field where we can upload different kind of files , for our example we will upload simple text files.
To do this we need to follow these 3 steps :
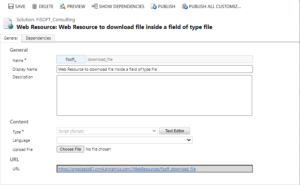
Step 1 – Create a field of type File
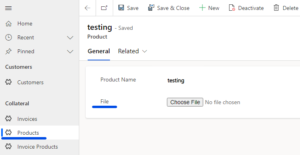
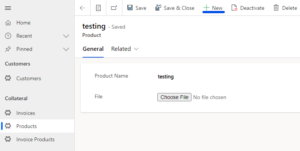
Open a CRM test environment and create a File field in a custom entity and add this field to the form of that entity , I created a File field named File (logical name : fisoft_file) in a custom entity named Product (logical name : fisoft_product) and added this field to the main form of this entity as seen below :
Step 2 – Add a ‘Download File’ button
We can show this button either :
Inside the main form of each record , for example the ‘New’ button in the picture below is found inside each specific record we open from the Product entity :
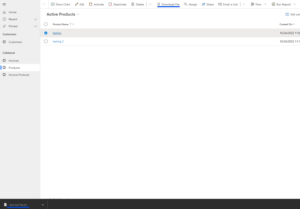
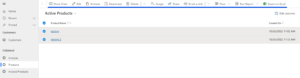
Outside the form in the list view , just like the example above we also have a identical looking button on the outside of the records , in the list view of the entity.
Important : The two ‘New’ buttons from the pictures above are identical looking but they are completely different and separate buttons , by different I don’t mean that they do different things in fact they have the same exact logic and look but they are part of different ribbons which it kind of makes them identical twins :p
Step 3 – Add the JavaScript Web Resource that contains the functionality for the button
To do this we can create a separate Solution from the one we created for the button , or you can use the solution you used when you created the File field , in this solution create a new JavaScript Web Resource and add the code as shown below (WARNING : Don’t forget to change the bolded text in the code with your environment values) :
"use strict";
var __awaiter = (this && this.__awaiter) || function (thisArg, _arguments, P, generator) {
  function adopt(value) { return value instanceof P ? value : new P(function (resolve) { resolve(value); }); }
  return new (P || (P = Promise))(function (resolve, reject) {
    function fulfilled(value) { try { step(generator.next(value)); } catch (e) { reject(e); } }
    function rejected(value) { try { step(generator["throw"](value)); } catch (e) { reject(e); } }
    function step(result) { result.done ? resolve(result.value) : adopt(result.value).then(fulfilled, rejected); }
    step((generator = generator.apply(thisArg, _arguments || [])).next());
  });
};

var FormNotificationLevel;
(function (FormNotificationLevel) {
  FormNotificationLevel[FormNotificationLevel["INFO"] = 0] = "INFO";
  FormNotificationLevel[FormNotificationLevel["WARNING"] = 1] = "WARNING";
  FormNotificationLevel[FormNotificationLevel["ERROR"] = 2] = "ERROR";
})(FormNotificationLevel || (FormNotificationLevel = {}));

var Entities;
(function (Entities) {
var ribbon;
(function (ribbon) {
  let Form;
  function PrepareFile(selecteditems) {
    return __awaiter(this, void 0, void 0, function* () {
      let selecteditem = selecteditems[0];
      let startBytes = 0;
      let increment = 4194304;
      const url = Xrm.Utility.getGlobalContext().getClientUrl() + "/api/data/v9.2/YOUR_ENTITY_LOGICAL_NAME-(" + selecteditem.Id + ")/YOUR_FILE_FIELD_LOGICAL_NAME?size=full";
      let finalContent = "";
      let fileSize = 0;
      let fileName = "";
      while (startBytes <= fileSize) {
        let result = yield makeRequest("GET", url, startBytes, increment);
        let req = result.target;
        if (req.status === 206) {
          finalContent += JSON.parse(req.responseText).value;
          startBytes += increment;
          if (fileSize === 0) {
            fileSize = req.getResponseHeader("x-ms-file-size");
            fileName = req.getResponseHeader("x-ms-file-name");
          }
        }
        else {
          break;
        }
    }
    if (fileName != "") {
      downloadBase64File(fileName.split(".").pop(), finalContent, fileName);
    }
    else {
      let message = ("No attachment file to download for this record!");
      FormNotification(message, FormNotificationLevel.INFO, "info_NoAttachment");
    }
  });
}

ribbon.PrepareFile = PrepareFile;

function FormNotification(message, level, notificationId, autoClose = false, closeAfter = 10000) {
  Form.ui.setFormNotification(message, FormNotificationLevel[level], notificationId);
  if (autoClose) {
    setTimeout(function () {
      Form.ui.clearFormNotification(notificationId);
    }, closeAfter);
  }
}

function downloadBase64File(contentType, base64Data, fileName) {
   const linkSource = `data:${contentType};base64,${base64Data}`;
   const downloadLink = document.createElement("a");
   downloadLink.href = linkSource;
   downloadLink.download = fileName;
   downloadLink.click();
}

function makeRequest(method, url, startBytes, increment) {
   return __awaiter(this, void 0, void 0, function* () {
      return new Promise(function (resolve, reject) {
         let request = new XMLHttpRequest();
         request.open(method, url);
         request.setRequestHeader("Range", "bytes=" + startBytes + "-" + (startBytes + increment - 1));
         request.onload = resolve;
         request.onerror = reject;
         request.send();
      });
   });
}

})(ribbon = Entities.ribbon || (Entities.ribbon = {}));
})(Entities || (Entities = {}));
Continuation of Step 2 : Adding the button to the desired Ribbon
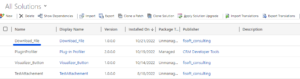
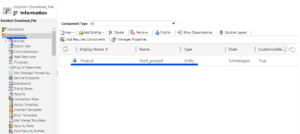
As explained earlier there are two places where we can add the button we will create. I personally choose to go with the later option for where to put the button but you can choose either one you like or even both (you have to create two different but identical buttons for that). Now that we decided where we want our button , we first need to create a new Solution (for the example named it : Download_File) which will only have inside it the entity where we want to add our button (in my case the Product entity) , the reason for this is because the tool Ribbon Workbench which is the tool that makes it possible for us to modify ribbons , can only open solutions that only contain one component inside them. (Component in CRM are called Entities/Option Sets/Site Maps/Web Resources/Processes/Dashboards etc). The pictures below show the solution created and what is inside this solution.
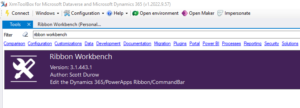
Now we head over to XrmToolBox and we open ‘Ribbon Workbench’ tool as shown below :
If we open the tool it will ask us to connect to an organization as shown below :
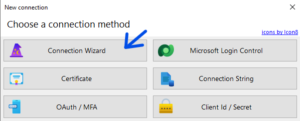
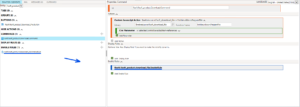
1. Choose the connection method , I always use the Connection Wizard :
2. After clicking on Connection Wizard , the pop-up below opens up , what you need to do is just copy and paste the environment URL of the environment you want to connect to :

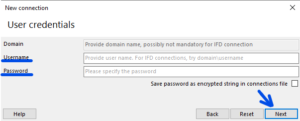
3. Then you need to enter user credentials for the environment you specified above
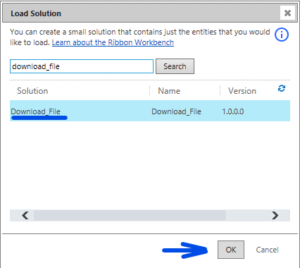
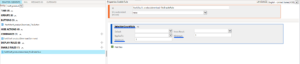
4. After that the Ribbon Workbench will open up and the below pop-up window will open up which at first shows all the solutions in this environment but you can also search just like I have done below :
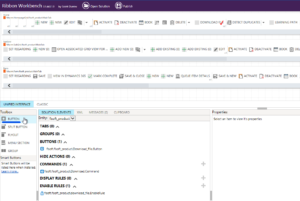
5. The picture below shows how Ribbon Workbench looks after loading a Solution , as you can see we get 3 ribbons in the upper half of the screen and in the lower half we get the buttons and the components to built them :
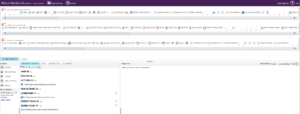
In this moment we first choose on which ribbon we want our button to be added and then from the left far side of the screen we click on one of the types of buttons shown and we drag it to the ribbon we want it , into the specific place we want it :
For this example I choose to add the button to the outside of the form of the record , in the list view where all the records are shown, for that I have added the button to the first ribbon on the top as shown below :

Now let’s see how this button is setup step by step :
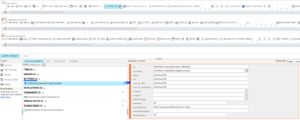
First after dragging the button to the desired place the ID (logical name) of the button shows up under the Buttons dropdown as shown above , if we click on this ID/Name then we mini-table on the right side opens up , that table is used to set the button properties , these are the main properties you might need to edit when adding buttons :
ID : This field hold a default ID/Logical Name but you can change it just like I have changed it above
Command : This filed is the one responsible for the functionality of the button , like the behavior of the button , visibility , what code should run on click on it etc.
Label : This field is the field that dictates the name that the users sees when the button is shown.
Alt / Tool Tip Title / Tool Tip Description : These field are not mandatory , you can fill them if you like or leave them empty , they are descriptive fields for the user nothing more
Image 16 / Image 32 / Modern Image : These fields are used to specify an icon/image for the button you are adding , Image 16 should be of size 16×16 px (format PNG), Image 32 should be of size 32×32 px (format PNG) and Modern Image should be of size 16×16 px (format SVG).
At first the Command filed is empty because you would not have a command yet created , but since I have created the button before making this blog then every field is filled but the Command field is of type dropdown not a text box so nothing would show up if you have not created the Command, let’s see how the Command is created :
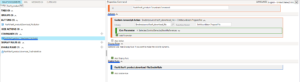
As you can see above the Command created for the button is separated on three different sections :
- Actions : In this section you specify what the button will do on click of it , the action that it’s going to perform.
- Display Rules : In this section you can specify when and how the button will get displayed.
- Enable Rules : In this section you can specify rules for when the button will get enabled/functional.
In the picture above we have specified an Action and an Enable Rule , let’s see why have we done so :
1. The Action :
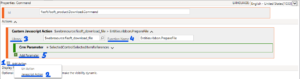
So we add a ‘JavaScript Action’ and by following the steps above we specify the library (this is the Web Resource we created earlier) then we specify the name of the function we want to be triggered on click of this button (function form the JavaScript code) then we add an ‘CRM Parameter’ which is a parameter which gets passed to the function we trigger , what this parameter does is pass to the code all the data for the record we selected in the list view of the entity.
2. The Enable Rule :
Just like the Command the Enable Rules first need to be created then get added inside the Command , so let’s see how they are created :
So as seen we have added an ‘SelectedCountRule’ as a step for our Enable Rules , the purpose of this step is this : when the user selects one record from the list view than make the button enable/visible , the maximum is set to 1 and the minimum to 1 , which means that the minimum records selected for the button to show is 1 and the maximum is 1 , if we don’t select anything then the button is not visible and if we select more then 1 record the button gets disabled.
After we have setup everything as explained until now , we add the Enable Rule to the Command and than we add the Command to the Button and then we click on publish as below and we wait for the Workbench Ribbon to finish publishing the changes we made :

– Development Testing
After the Ribbon Workbench has finished publishing the changes to the CRM environment , all left to do is head over to CRM and test if everything is working as we desire :
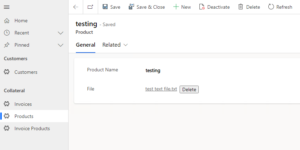
First we go the Product entity and we create a new record if there are no records or update an existing record , as seen below I have to create a record since I don’t have any existing ones :
As seen below I have created a record named ‘testing’ and I have attached a File in the File field named ‘test text file’ , click save/save & close and go back to the list view of the entity.
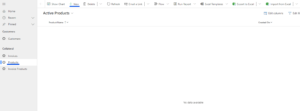
Now that we are on the list view for all records , we haven’t selected our newly created record and we surely do not see the button we created earlier :

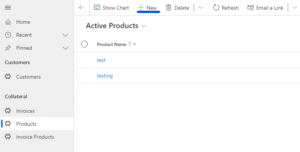
Now that we have selected the record we can see the ‘Download File’ button show up on the top ribbon.

After creating another record and selecting both of them , we can see that our ‘Download File’ button gets disabled/hidden. So our Enable Rule works fine.
After selecting the first created record and clicking on the ‘Download File’ button we can see the text file gets downloaded locally as expected :