
In todays blog we will see how to work with APIs in MSD 365 and how to manipulate the data we get from the API. To showcase APIs and data manipulation we will be using a free API from the web :
http://universities.hipolabs.com/search?country=CountryName //feel free to choose whatever country you want
What this API does is that it returns all the universities/colleges that can be found in a specific country. In order to retrieve the university/colleges data for the country we want, all we have to do is pass the country name as a parameter to our API link so when the request is made the API understands what country’s data we want.
After retrieving the data, just for this example we can do this, for as many universities/colleges that we retrieve we want a distinct record created for each of them in CRM and inside these records we can find the respective data for each university/college.
There is a question though : In what moment do we want our records to be created, when will the JS code get triggered ?? We can have the code run onLoad of our custom entity (for this example fisoft_universities) but in order for the user to trigger this code there’s the need to open an existing record or click on the ‘new’ button , these steps seem like a lot of unrelated work for our task and a bit bothersome for the user. The other solution we can implement is to add a button on the entity record list , so the user can click it without any unnecessary steps. So as decided we will be adding a button in the form ribbon of the custom entity , and on click of this button we will retrieve the data from the API and then create the records.
So basically this whole ‘task’ can be summed up in 3 steps to be completed :
1) Create the custom button with Ribbon Workbench
2) Use the API to retrieve all universities for a country you want (Of course I choose Albania).
3) Use the retrieved data to create distinct records in a custom entity in CRM.
Step 1 : Create the custom button with Ribbon Workbench
First, let’s create the custom button that will trigger the JavaScript code on click of it by the user :
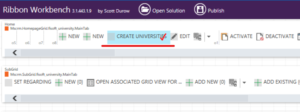
*Note : For a more detailed explanation of how to add a button using Ribbon Workbench check this blog out (Click here)*
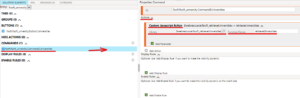
After adding the button to the ribbon , we need to setup it’s properties as shown in the picture below :
- Id : This is the logical name of the button , you can change it as you like
- Command : This field is a drop-down list and here you can choose a command , this command is responsible for the button functionality and behavior, in the beginning this field is empty but after we create the command for this button we can come back here and select it
- Label : This field is used to setup the label of button or the name of the button that the user will see.
- Sequence & TemplateAlias : These fields are automatic , don’t move them.

In the picture below we setup the Command that we mentioned in the step above, all this command will contain is an Custom JavaScript Action , in this action we have specified the Library which is basically the web resource we want to run (here add the web resource that we create later) and we specify the Function Name which basically is the name of the main function in our JS code.
After doing all the steps, click on Publish and the button is finished and ready.
Step 2 : Retrieve data using the API
Then, we need to write the JavaScript code that will send the GET request and so the API responds with the data we need. In order to do that we will be using Fetch API (feel free to use : XMLHttpRequest, Jquery Ajax, Axios or Angular HttpClient etc. , whichever you feel most comfortable). The code for this is shown below , feel free to go through it because there are comments that explain everything.
async function retrieveUniversities() {
    var apiUrl = `http://universities.hipolabs.com/search?country=Albania`;  //the url we will use to make the request
    const Universities = await fetchUnis(apiUrl);   //variable that saves the response data from the fetchUnis(apiUrl) function

    //wierdly the API returned the same values twice so the two lines of code below get rid of duplicates based on university name
    const key = 'name';  //key is the value we will use to dictate distinction
    const disinctUniversities = [...new Map(Universities.map(item => [item(key),item])).values()];
}

async function fetchUnis(url) {
    try{
        const res = await fetch(url);  //variable that saves the unmodified response data we get form the fetch(url) function
        const data = await res.json(); //variable that saves the data after it has been converted in JSON format from the .json() function
        return data;  //this line returns the modified json data to our Universities variable in the main function above
    }
    catch (error){
        return console.log(error); //this return all the errors that might happen during the request or response
    }
}
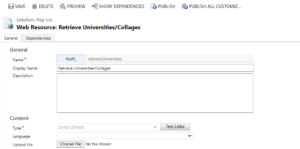
Since we have the first part of the code, we need to create the JavaScript web resource so we can add it to the button we created earlier this way we can trigger and debug the code in CRM :
Now we can debug the code above we can see as shown below how the data is retrieved and modified in the JSON format.
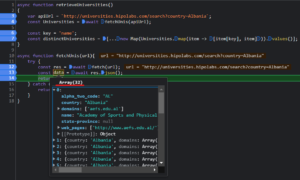
As seen above the retrieved data returned by the API is in JSON format but after checking it, every record retrieved had one other duplicate of it (API’s fault) in the array so we have to remove all the duplicates returned from the API , for this purpose we used the two lines of code below :

As seen from the pictures above we went from 32 records returned from the API to 16 records filtered by their name.
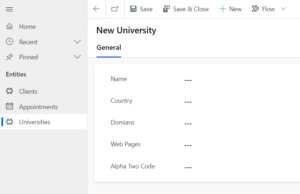
Also in order to create records for each of these retrieved universities we need to create the needed fields in our custom entity, in our case as seen below we have to create these fields :
- Name (single line of text)
- Country (single line of text)
- Domains (single line of text)
- Web Pages (single line of text)
- Alpha To Code (single line of text)
Step 3 : Use the retrieved data to create distinct records
Now that we retrieved the distinct data from the API, we need to add the code that makes it possible to create records for each of these retrieved universities. To do that we will use the code below :
//NOTE : all the code made bold is the new added code

async function retrieveUniversities(){
    var apiUrl = `http://universities.hipolabs.com/search?country=Albania`;
    const Universities = await fetchUnis(apiUrl);
    const key = 'name';
    const distinctUniversities = [...new Map(Universities.map(item => [item[key], item])).values()];

    for(var i = 0; i < distinctUniversities.length; i++){

        //variable data is JSON object defining the columns and values for the new entity record
        //the key values are the logical names of the fields we created earlier
        //the values assigned to the keys are set dynamically by using the distinctUniversities and the for loop
        var data =
        {
            //format => key : value
            "fisoft_name": distinctUniversities[i].name,
            "fisoft_country": distinctUniversities[i].country,
            "fisoft_alpha_two_code": distinctUniversities[i].alpha_two_code,
            "fisoft_domians": distinctUniversities[i].domains[0],
            "fisoft_webpages": distinctUniversities[i].web_pages[0]
        }

        //This is a build-in method by Microsoft, this method creates a single record in our desired entity
        //This method takes two parameters, 1)entity_logical_name & 2)variable data which specifies the fields to be filled
        Xrm.WebApi.createRecord("fisoft_university", data).then(
            function success(result) {
                console.log("Account created with ID: " + result.id);
            },
            function (error) {
                console.log(error.message);
            }
        );
    }
}

async function fetchUnis(url){
    try {
        const res = await fetch(url);
        const data = await res.json();
        return data;
    } catch (error) {
        return console.log(error);
    }
}
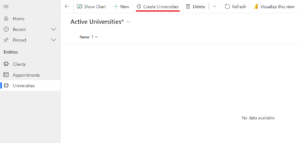
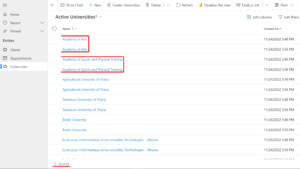
After saving the code let’s go to CRM and see what happens when we click the button we created earlier, as seen below we have no records and our custom button is visible :
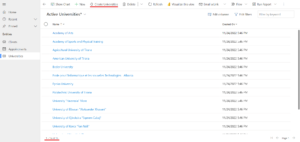
On click of the button our records are created as seen below :
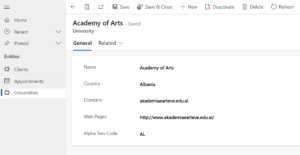
If we open one of the created records, we can see what values do the fields have and as seen below the values of these fields are the correct data that we retrieved from the API :
But we have a problem, if the user re-clicks the button the same records get created in CRM but we don’t want any duplicate records. The problem is shown below :
So as seen above we have a duplication of records which are the same as the previous records, we have to fix this. For that you can modify the previous code to the code below (this is the final code) :
async function retrieveUniversities(){
    var apiUrl = `http://universities.hipolabs.com/search?country=Albania`;
    const Universities = await fetchUnis(apiUrl);

    const key = 'name';
    const distinctUniversities = [...new Map(Universities.map(item =>[item[key], item])).values()];

    //global array variable that will contain all the names of existing university records in CRM before the code runs
    var existingUniversities = [];

    //Build-in method by Microsoft, this method makes it possible to retrieve records from an entity based on a filer you want
    //This method takes 2 parametes: 1)entity_logical_name & 2)the filter that you want to put on the retrieve
    //For our case the filter put is to only retireve only the names of all the existing records
    Xrm.WebApi.retrieveMultipleRecords("fisoft_university", "?$select=fisoft_name").then(
        function success(result) {
            for (var i = 0; i < result.entities.length; i++) {
                //local variable to save the names
                let universityNames = {};
                //universityNames.name saves the data in an object format(key:value)
                universityNames.name = result.entities[i].fisoft_name;
                //we push the local variable to our global variable so our values are there and we can use that variable all over the code
                existingUniversities.push(universityNames);
            }

            for( var i = 0; i < distinctUniversities.length; i++){
                var universityExists = false;  //Boolean variable
                var data =
                {
                    "fisoft_name": distinctUniversities[i].name,
                    "fisoft_country": distinctUniversities[i].country,
                    "fisoft_alpha_two_code": distinctUniversities[i].alpha_two_code,
                    "fisoft_domians": distinctUniversities[i].domains[0],
                    "fisoft_webpages": distinctUniversities[i].web_pages[0]
                }

                //The FOR loop is used to iterate through the existingUniversities array
                for(var j = 0; j < existingUniversities.length; j++){
                    //This IF checks if the existingUniversities array contains the name of the record that is being created
                    //If the name is contained then that means that this record already exists and we don't want it to be created
                    if((existingUniversities[j].name).includes(data.fisoft_name)){
                        //Since the name is contained then make our universityExists variable equal to true
                        universityExists = true;
                        //break out of the loop because we now know if the record already exists once
                        break;
                    }
                }

                //If after the prevoius FOR Loop the universityExists variable is still equal to false than that means the record..
                //..doesn't exist so we allow the creation of a new record
                if(universityExists == false){

                    Xrm.WebApi.createRecord("fisoft_university", data).then(
                        function success(result) {
                            console.log("Account created with ID: " + result.id);
                        },
                        function (error) {
                            console.log(error.message);
                        }
                    );
                }
            }
        },
        function (error) {
            console.log(error.message);
            // handle error conditions
        }
    );
}

async function fetchUnis(url){
    try {
        const res = await fetch(url);
        const data = await res.json();
        return data;
    } catch (error) {
        return console.log(error);
    }
}
After changing the code in the web resource , now we go back to CRM to test everything. In the video below you can see how the code works, I deleted the pervious records and then clicked on the button to create the new records, then re-clicked on it and nothing happens which means our distinct condition works fine.