
In today’s blog we will see how to incorporate Power Pages with CRM.
To showcase today’s blog I have chosen to do this development :
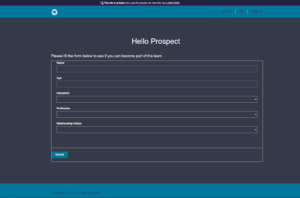
So basically, what we want to be done is to create a Power Page which will have a form (the form on the page is connected to the main form of a custom entity we choose, in our case entity Prospects) on it where the new users that visit the page can populate the fields with their personal information. This form will contain questions of type: Name, Age, Education (High School, Bachelor, Master), Profession, Relationship Status etc. (maybe even more questions you want to ask the user)
After the user submits the form, we create a prospect record in a custom entity called ‘Prospect’ in CRM, this new record will contain all the data that the user inputted on the page. After the prospect record has been created, we want to create a contact record if this prospect record fulfills a few conditions. To do this we can use a plugin on create of a new Prospect record, so when the new prospect record gets created, we do the checking for the conditions below:
Let’s say if the user responds with education = high school then give him 10pts, if education = bachelor give him 20pts and if education = master then give him 30pts. Make similar Check conditions for all the other fields you want to have on the form. (The values for the condition are made up on the spot but they can change later based on other things you want to take in consideration). Then after all the conditions we check if the total amount of points the user accumulates is equal to 100 (let’s say for the example) then we create a new Contact record else we skip creating a new Contact record for this prospect. So the prospects either become clients (contacts) or they are stuck as prospects who don’t fulfill the conditions to become our clients.
Now let’s separate the development into steps so it’s easier for us to do everything:
1. Create a Power Page, create two custom entities named ‘Prospects’ & ‘Contacts’ and all the fields needed (the same exact fields for both), add them into the main form of these entities then in the form inside the power portal call the main form of the Prospect entity to showcase for all users that visit the page.
2. When the user submits the form, a new Prospect record should be created containing all the data from the form.
3. Create a Plugin on create of the Prospect entity, which every time a new Prospect record is created the conditions for the user are checked and if the conditions are fulfilled then we want the plugin to create a new record in another custom entity named Contacts which will also have the same data as Prospect.
– First, what are Power Pages ?
Microsoft Power Pages is a secure, enterprise-grade, low-code software as a service (SaaS) platform for creating, hosting, and administering modern external-facing business websites. Whether you’re a low-code maker or a professional developer, Power Pages enables you to rapidly design, configure, and publish websites that seamlessly work across web browsers and devices.
1. Create the Power Page, the Prospect entity and all the fields we need
Let’s start by creating the Power Portal which after setting up it takes quite some time to finish and to get ready for use, meanwhile we can create the entity and the fields while the Power Portal page gets loaded.
So, first we head to make.powerpages.com, where we login into our organization and we follow the steps below to create a new power pages website:

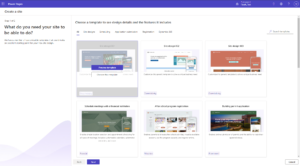
After clicking on ‘Create a site’ a new page opens up where you can choose a template (choose one you like, if you don’t like the templates don’t worry everything is fully customizable from the colors to every element on the webpage) :
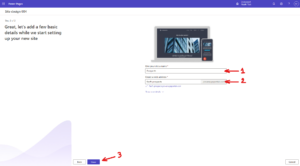
After selecting one of the templates and clicking on ‘Choose this template’ then a new page opens up where you can specify the name and the URL for this webpage you are creating:
After clicking done, you will get directed to the first page we started and the website will look like this:
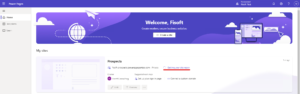
And as you can see it says ‘Getting your site ready’, this will take a while (15 to 20 minutes max), so while the page get’s ready let’s go and create the custom entity Prospects and all the fields we want:
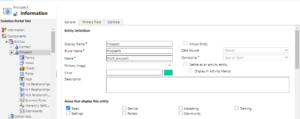
Then we also create all the fields we want, I have added the fields below but you can add more if you want:
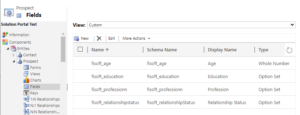
Note*: Education, Profession, Relationship Status are all option-set fields and they have these options each:
Education = High School / Bachelor’s degree / Master’s degree
Profession = Engineering / Economics / Law / Medical
Relationship Status = Single / Engaged / Married / Complicated
(Since this is only a sample development I had some fun with the options so don’t take them seriously 🙂 )
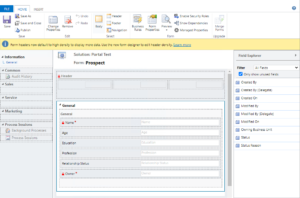
After creating the fields then we modify the main form of this entity and we add all these fields into it to look as below:
Note*: Do the same thing for the other custom entity Contact that we will need, create the entity and the same fields as above. (Also for the ones confused wondering where did the Name field come from, this field is the primary field created automatically when the entity gets created so don’t worry because I also did let it get created by default)
Now that the entity, fields and the forms are ready we can go back to Power Pages website and check if the site we created has finished setting up so we can modify it:

As you can see in the picture above the site has finished setting up because the ‘Edit’ and ‘Preview’ buttons are now clickable, so let’s click Edit and add the form we created earlier to our page:
And as you can see this is how the editing environment looks like, and all the square borders inside the page represent objects, section, forms etc and clicking on inside their border it allows you to modify, reposition or delete the element. Now for our example I will delete all the other pages except the ‘Home’ page where I’ll only have like a welcoming message for the user and the form:
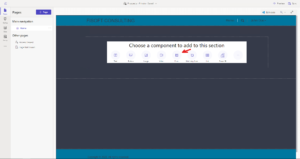
As you can see I have deleted all the other pages and everything inside the ‘Home’ page, and ass you can see above every time you add a new section it gives you the opportunity to choose what kind of component do you want this section to have, in our case we need to add a Form. So now let’s add the form we created in the Prospect entity, after choosing Form a new pop-up opens that looks like this:
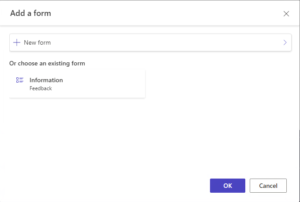
Click on ‘New Form’, and a new window will open up that will look like this:
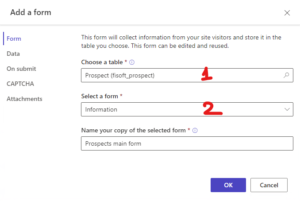
As you can see on the left of the new opened window we have a list (Form, Data, On Submit, Captcha, Attachments), in each of them we can modify the new form’s behavior , so let’s see each of them,
In the Form tab , we can choose in what table do we want our data from the form to be saved (in this case the Prospect entity we created earlier), the ‘Select a form’ let’s you select a specific form inside this table/entity we select ‘Information’ which is the only option for now but if you create other custom forms inside the entity then you can select them here but for the moment the main form shows up. The last field is the name you want to give the created form inside the power pages. Let’s move on to the next tab :

On the ‘Data’ tab we specify what the form does after the user clicks submit, in our case we want to create a new record but you can also see the other options in the picture above.
Let’s see the next tab:
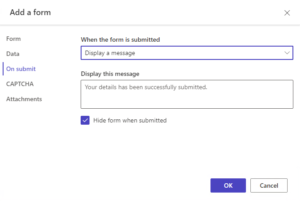

On the ‘On Submit’ tab we can specify what does happen with the page after clicking submit and you can see the options above, I left it as it was by default which will display a message.
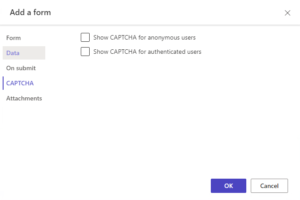
On the ‘Captcha’ you can choose to show captcha authentication on the form for anonymous and authenticated user, personally I turned them of but If you want to play around with them feel free.
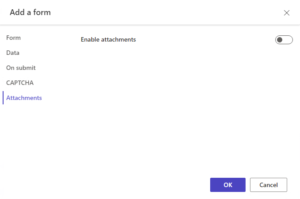
And lastly on the ‘Attachments’ tab you can either choose to allow users to add attachments or not.
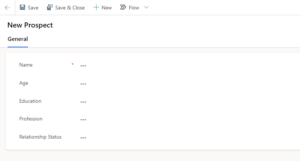
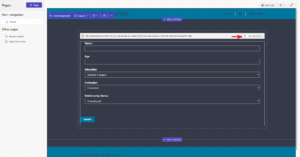
With everything set up as shown in the pictures we click on ‘OK’ on the bottom of the pop-up and the form shows up on our page as shown below:
In order for the form to view for users you need to setup permissions as shown below :
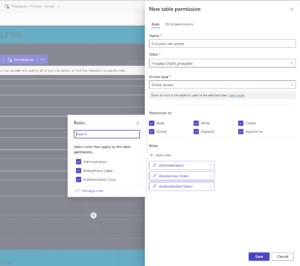
So for this example I gave full permissions to everyone (Admins, anonymous users and authenticated users), but you can modify the permissions and roles however you like. Click on ‘Save’ and the form is ready.
I also added a few text boxes and the final page will look like this:
2. When the user submits the form, a new Prospect record should be created containing all the data from the form
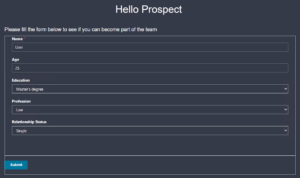
Let’s fill the form with some sample data and see what happens when we click ‘Submit’:
After submitting the form the following message shows up on the page:

Now if we go back to CRM and we open the Prospect entity and see what happens after the user submits :
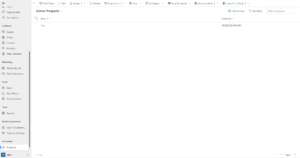
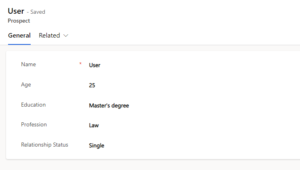
As seen in the pictures above in the Prospect entity a new record has been created after the user submitted the form in the webpage, if we open the page we can see the same values that the user inputted/selected.
3. Create Plugin to trigger on create of a Prospect entity record
The last thing to do is to create a new plugin which will trigger every time a new Prospect record gets created, inside this plugin we will retrieve all the values of the fields that the user has inputted and we will check what custom condition do they fulfill and we will assign different points for different conditions and in the end if this Prospect record accumulates 100 points then we create a new Contact record with the same field values as the Prospect record.
The code used for this plugin is the code below:
using System;
using Microsoft.Xrm.Sdk;
using System.ServiceModel;

namespace Prospect_OnCreate
  {
    public class Class1 : IPlugin
      {
         public void Execute(IServiceProvider serviceProvider)
           {
             ITracingService tracingService = (ITracingService)serviceProvider.GetService(typeof(ITracingService));
             IPluginExecutionContext context = (IPluginExecutionContext)serviceProvider.GetService(typeof(IPluginExecutionContext));
             IOrganizationServiceFactory serviceFactory = (IOrganizationServiceFactory)serviceProvider.GetService(typeof(IOrganizationServiceFactory));
             IOrganizationService service = serviceFactory.CreateOrganizationService(context.UserId);

             if (context.InputParameters.Contains("Target") && context.InputParameters["Target"] is Entity)
             {
               //get the context of the target entity, which is the entity we specify when we setup the plugin in the PluginRegistrationTool
               //in our case the Prospect entity
               Entity prospectEntity = (Entity)context.InputParameters["Target"];

               try
               {
                 //the points variable will get incremented while the code runs and then we use it in the end of the code
                 int points = 0;

                 //the name variable will contain the retrieved value of the field Name from the new Prospect record
                 string name = (string)prospectEntity["fisoft_name"];

                 //the age variable will contain the retrieved value of the field Age from the new Prospect record
                 int age = (int)prospectEntity["fisoft_age"];

                 //condition for the age, feel free to change it as you like
                 if (age >= 18)
                 {
                   //if age is bigger or equal to 18 then increment the points variable by 10 points
                   points += 10;
                 }

                 //educationSelectedValue variable will contain the retrieved value that the user chose for the education option-set field
                 //the code doesn't retrieve the option's label but the option's logical id
                 //when creating the option-set field you also create the options and there you can set or just check the ids
                 //the logical ids of the options: high school = 874630000 ; bachelor = 874630001 ; master = 874630002
                 OptionSetValue education = (OptionSetValue)prospectEntity["fisoft_education"];
                 int educationSelectedValue = education.Value;

                 //switch condition based on the retrieved value, each case has a different incremented points value
                 switch (educationSelectedValue)
                 {
                   case 874630000:
                     points += 10;
                     break;

                   case 874630001:
                     points += 30;
                     break;

                   case 874630002:
                     points += 50;
                     break;

                   default:
                     points += 0;
                     break;
                 }

                 //profesionSelectedValue variable will contain the retrieved value that the user chose for the profession option-set field
                 //the logical ids: engeenering = 874630000 ; economics = 874630001 ; law = 874630002 ; medical = 874630003
                 OptionSetValue profesion = (OptionSetValue)prospectEntity["fisoft_professionn"];
                 int profesionSelectedValue = education.Value;

                 //switch condition based on the retrieved value, each case has a different increment points value
                 switch (profesionSelectedValue)
                 {
                   case 874630000:
                     points += 50;
                     break;

                   case 874630001:
                     points += 40;
                     break;

                   case 874630002:
                     points += 30;
                     break;

                   case 874630003:
                     points += 10;
                     break;

                   default:
                     points += 0;
                     break;
                 }

                 //relationshipStatusSelectedTopicValue variable will contain the retrieved value that the user chose for the relationship status option-set field
                 //the logical ids: single = 874630000 ; engaged = 874630001 ; married = 874630002 ; complicated = 874630003
                 OptionSetValue relationshipStatus = (OptionSetValue)prospectEntity["fisoft_relationshipstatus"];
                 int relationshipStatusSelectedTopicValue = relationshipStatus.Value;

                 //switch condition based on the retrieved value, each case has a different increment points value
                 switch (relationshipStatusSelectedTopicValue)
                 {
                   case 874630000:
                     points += 10;
                     break;

                   case 874630001:
                     points += 30;
                     break;

                   case 874630002:
                     points += 50;
                     break;

                   case 874630003:
                     points += 0;
                     break;

                   default:
                     points += 0;
                     break;
                 }

                 //if condition to check if the accumulated points are bigger or equal to 100
                 if(points >= 100)
                 {
                   //if the condition is fulfilled then create a new Contact record with the values as below
                   Entity newContact = new Entity("fisoft_contact");
                   newContact["fisoft_name"] = name;
                   newContact["fisoft_age"] = age;
                   newContact["fisoft_education"] = new OptionSetValue(educationSelectedValue) ;
                   newContact["fisoft_profession"] = new OptionSetValue(profesionSelectedValue) ;
                   newContact["fisoft_relationshipstatus"] = new OptionSetValue(relationshipStatusSelectedTopicValue);
                   service.Create(newContact);
                 }
               }
               catch (FaultException<OrganizationServiceFault> ex)
               {
               throw new InvalidPluginExecutionException("An error occurred in FollowUpPlugin.", ex);
             }
           }
         }
      }
    }
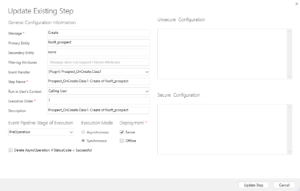
So you can get the code above if you have the same fields as me or if you have additional fields you can add conditions, then build the project in Visual Studio, open Plugin Registration Tool and register the plugin then add a new step with Message = Create and the Primary Entity = Prospect entity, as seen below:
After we are finished setting up the step, then we head over to the webpage that we created earlier and we complete the form with some other sample data to see what will happen with both our entities:
As you can see in the video above everything works as expected, first there is only the ‘User’ record in the Prospects entity that we created earlier, if a user fills the form on the Power Portal then a new prospect record ‘User 2’ gets created.
In that moment the plugin gets triggered and if we go to the Contacts entity, a new Contact record named ‘User 2’ has been created with the same values as the record ‘User 2’ of the Prospect entity which means this Prospect got 100 or more points through the conditions, else if the points are less then 100 then only the Prospect record gets created, there will not be created a Contact record for that Prospect.
This concludes the development, feel free to edit and try new things on your own. Have fun & thank you for reading 🙂