
![]()
Today we will talk about Power Automate and Power Automate Flows , well firstly you must be wondering :
What is a Flow ?
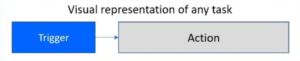
In simplest terms, a flow is a visual representation of any task. You can think about it as a storyboard as to what your task looks like.
What is Microsoft Power Automate ?
Microsoft Power Automate enables users to create and automate workflows and tasks across business applications without the need for technical experience. These automated workflows are called ‘flows’ and there are different types of flow automation available. We’ll take a look at how flows work in Power Automate, the types of flows available, and provide examples of the most appropriate place to use them.
How do flows in Power Automate work ?
A flow communicates between your business applications so they can work with each other to eliminate the need for manual processes. A flow begins with a ‘trigger’, a pre-defined event that then triggers a response. As part of the Power Platform, Power Automate is a low-code solution, meaning anyone from a basic business user to an IT professional can create automated processes. There is no need to write code, as the point-and-click flow designer will allow you to build the workflows you require.
Types of Power Automate Flows available :
There are three main types of flows in Microsoft Power Automate :
– Cloud Flows
The cloud flow is the most used type of flow available and enables users to trigger automation processes automatically, instantly, or via a schedule. Below are the characteristics and examples of the different types of Cloud Flow:
- Automated Flows – An Automated Flow triggers when a condition is met. For example, it could be triggered by an event such as the arrival of an email from a specific person, or a mention of your company on social media. Connecters are used to establish communications between your accounts and cloud or on-premises services.
- Instant Flows – Instant Flows allow you to start a flow with a click of a button, and can be used across desktop or mobile devices. They are commonly used to automate a wide range of tasks such as requesting an approval in Teams or SharePoint or sending a reminder to the team with a push of a button from mobile.
- Scheduled Flows – Scheduled flows are perfect for tasks that need to be automated on a schedule and will run based on a set date or time. For example, you can use this flow to automate a data upload to SharePoint or Dynamics 365 on a daily basis.
– Business Process Flow
Business Process Flows help you to ensure consistency across your business, providing a guide for people to carry out work. They provide a streamlined user experience that leads people through a defined process and can be tailored to different roles within an organization. You can help ensure that people enter data consistently and follow the same steps every time they work with a customer by creating a business process flow.
For example, a business process flow can be created to ensure every customer service request is handled the same way, or to require all people to get approval for an invoice before an order can be submitted.
– Desktop Flows
Desktop flows are used to automate tasks on the Web or the desktop. Using Power Automate Desktop, business can automate tasks on the desktop as well as the Web.
Features of Flows :
1. A Power Automate Flow Can Have Multiple Actions
Flows can obviously have multiple actions. You can have a flow that’s triggered by a tweet, and triggers different actions. It can send you an email and add it to your Trello card or list of to-dos. Then, it can send you a slack message as well.

2. A Power Automate Flow Can Have Conditions
Flows can also have very complex logic. You can have a flow wherein if it’s triggered by a tweet, it then checks if the tweet is something that you want to keep or not.
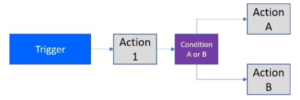
Let’s say the condition is if the tweet about your brand is either positive or negative. Action A is for you to retweet it if it’s positive. If it’s not positive, then Action B is for you to receive an email and store it away. You can even set a Trello card for yourself to reply to that person and ask them why they said negative things about your company.
3. A Power Automate Flow Can Have Loops
Flows can also have loops as well. This is a bit more complicated, but you can basically have flows that continuously loop through until a certain event occurs.
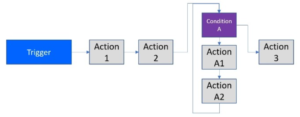
For example, let’s say you want to keep messaging someone on Slack every five seconds until they’ve sent you a file. You can definitely integrate that into your flow.
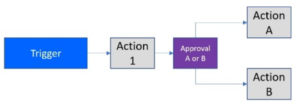
4. A Power Automate Flow Can Have Approvals
You can have an approval system wherein after an action, something gets sent to someone else. Then based on their response, varying things may occur. Hence, they can choose either of the actions that they want to occur.
Custom flow creation example :
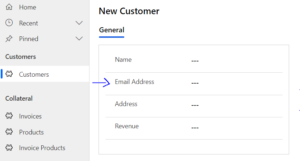
Now it’s time for an easy example , where we can create our own custom flow from scratch and see the whole creation process. For our example we will build a flow which will send an email to every new Customer we add in CRM , for our example the main field needed is an email field which will hold the Customers email address , as shown below :
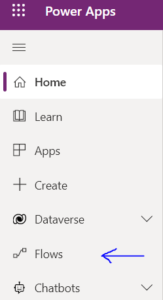
After having our needed fields ready we head to make.powerapps.com and we click on the “Flows” button as shown below :
After the flows window opens , we click on the “New flow” button above so we can create our new flow :
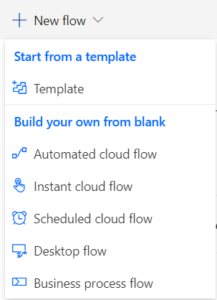
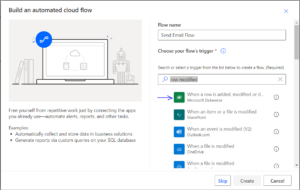
Then we click on the “Automated cloud flow” as shown in the picture , we will choose that type of flow because we want it to be triggered when a condition is met , in our case the condition will be met when the “Email Address” field from the picture above gets updated by the user.
After choosing the type of flow we want , a new window will open up which allows us to name our flow and also choose the trigger of the flow :
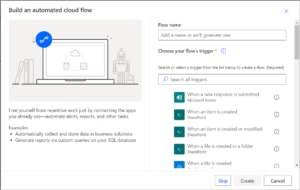
We can either give the flow it’s name and trigger at this moment or click skip and do it after , but each way you prefer does the same thing. First , since we are in this screen let’s name our flow “Send Email Flow” and for the flow trigger search “row modified” , click the one as shown below and then create :
After clicking the “create” button (even if we click “skip”) we get directed to the “Flow edit environment” where we modify our flow to our needs , it looks something like this:
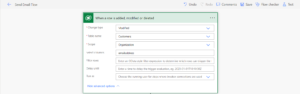
For our example you need to fill the same fields as shown above , let’s explain each of them :
- Change Type – this field specifies the type action performed on our wanted field , in our case we want to do something when we update the field value so we choose “Modified”
- Table Name – this field specifies the name of the table where we will perform the update/modify action
- Scope – this field refers to how far-reaching the trigger will be within your organization.
- Select columns – this field specifies the field we want this trigger to work on , so because we want just the “Email Address” we input the logical name of the field.
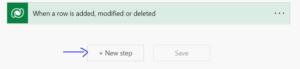
After setting up the trigger , we need to add a “New step” which will take care of sending the email every time our “Email Address” is updated , to do this we click the “New step” button under our first trigger as shown below :
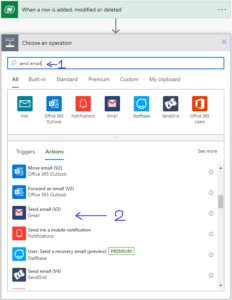
After clicking it then a new block will be added below the first one and it’s going to ask you to “Choose an operation”, search “send email” and choose the type of email provider you want to use as the sender of the emails (for this example I’m using my personal gmail account to send the emails so I choose gmail) :
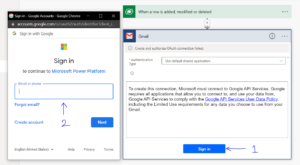
After selecting the wanted provider for the email sender , we first create a new connection between the email we want to use to send emails and the provider as shown below (follow the steps and login using an account) :
After creating the connection , we get directed to the view below where we setup the structure of the sending email :
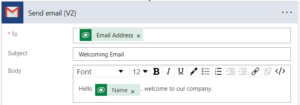
As you can see in the pic above we have the structure of the email we are going to send :
- To – this specifies the email address of the person we want this email to be sent to. The green square which reads “Email Address” is called “dynamic content” in Power Automate Flows , basically that green square refers the “Email Address” in CRM where the user puts the email address as shown in the first picture of this example , so these “dynamic contents” directly take the values of the fields specified.
- Subject – the subject of the email
- Body – body of the email , here we also have a “dynamic content” parameter that retrieves whatever name the user puts in the “Name” field in CRM when creating the new user.
After following all the steps click save under the flow or in the ribbon above so the modifications can be saved :
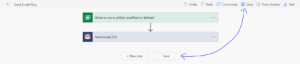
And with this we just created our first custom Power Automate Flow , now let’s see this flow at work. After saving the flow , you can see that the flow is turned on by default so you don’t have to do anything to turn it on except go to the CRM environment and trigger the flow by changing the field value:
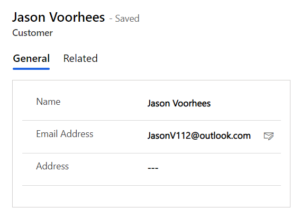
Here as you can see , I have created a fake user also an email address just for the example. As you can see I have filled the “Email Address” field as shown above with an actual working email address , so let’s go check the receivers inbox if our sent email has arrived.
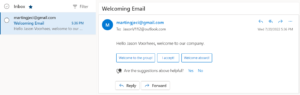
And as you can see the new customer received an email from us just as we wanted , you can also see the email structure which is the same with the one we had setup in the steps above. Our custom flow works perfectly fine , and also by using the same steps you can create as many flows that fulfill your users needs , depending on what you want to achieve the flows can get a bit more complicated but overall they have the same structure. Try creating your own flows , play around with it and you will get the hang of it in no time 🙂